
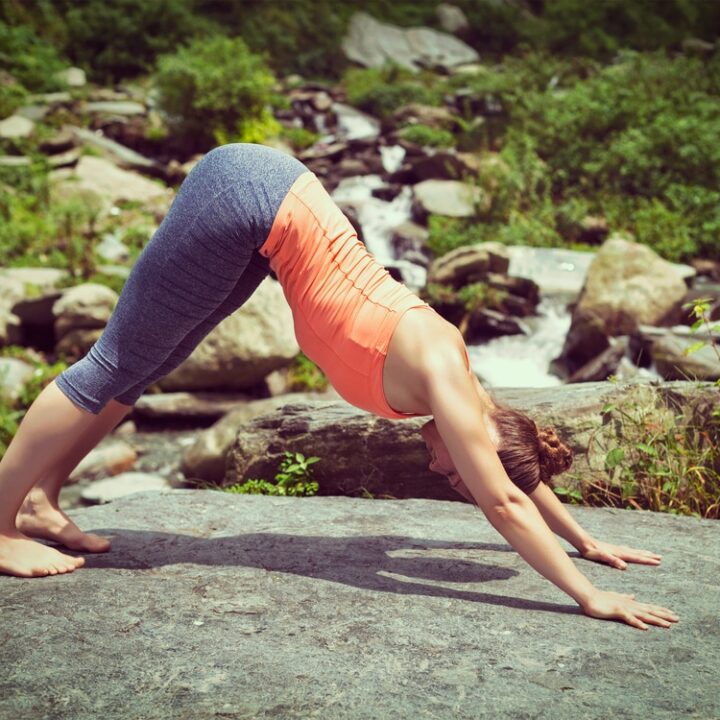
Are there any recommended yoga poses for plantar fascia?
What’s the best type of yoga for plantar fasciitis symptoms?
What is plantar fasciitis?
If you have been diagnosed with this condition, then you’re probably quite familiar with plantar fasciitis.
However, if this word is new to you, or this article came up for you on a google search, here’s a little background information for you.
There is a thick band of tissue that runs down the sole of your foot and connects your heel bones to your foot called the plantar fascia.
The inflammation of this area is called plantar fasciitis, which mainly causes pain in the heels, but also the soles of the feet.
You may experience a stabbing pain in your heel when you step out of bed, or you may feel the pain creep up after a long day of walking. Either way, it’s still considered plantar fasciitis.
What Causes Plantar Fasciitis?
Too much tension and stress on the plantar fascia can cause small tears, making it irritated and inflamed.
Normally, plantar fascia works as a shock absorber to support the arch in your foot and prevent pain in the heel, but just like other parts of the body, it can only take so much.
Risk factors that can result in these tears are exercises that place a lot of pressure on the heel. For example, plantar fasciitis can be caused by ballet, jumping, and long distance running.
Furthermore, as your body ages it weakens, consistent use, abnormal foot mechanics such as being flat-footed or having a high arch, obesity, and certain occupations that require frequent standing and walking can also lead to plantar fasciitis.
While these risk factors can apply to many individuals, you don’t need to worry. There are many ways to mitigate and treat this problem, with yoga being one of my suggestions.
Does Yoga Help Plantar Fasciitis?
While there are many types of yoga, we’ll be focusing on Yin Yoga because it is the most effective for this particular injury. Over time, Yin Yoga has evolved to be more relaxing and therapeutic helping to increase flexibility and heal injuries.
Although it is still distinctive in the sense that many poses are done close to the ground and they are held for 3 to 5 minutes, it was originally more vigorous and artistic due to the intensity of the animal-like poses.
The poses in modern Yin Yoga still resemble animals but are often practiced in less dramatic positions.
Also, poses from other forms of yoga have been adapted to Yin Yoga by being held for 3 to 5 minutes, due to the benefits.
In the next section, you will be described five of these modern, Yin yoga poses that specifically help with plantar fasciitis.
5 Yoga Poses for Plantar Fasciitis
It is important that before you practice these five yoga poses to treat plantar fasciitis, that you warm up your body with easier yoga poses, or other stretches and exercises to heat the body. Use poses that you’re familiar with, that does not put too much stress on your body. Once you are warmed up, it is appropriate to add these poses to your yoga sequence or to practice these poses in order.
1. Downward Facing Dog
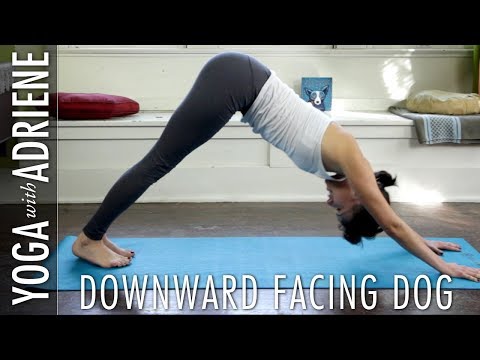
Benefits
Strengthens the shoulders and upper arms, lengthens the spine, and stretches the heels and back of the legs. In my opinion the downward facing dog is one of the best yoga stretches for plantar fasciitis.
Directions
Starting by coming down to your hands and knees, and then shift your torso forward, so that your shoulders are over your wrists. Next, lift the knees to come into a plank, making sure that your core is strong, and your wrists are protected.
From here, push the hips and torso back, so that you’re making an upside down “V” shape with your body. If your heels don’t touch the floor, don’t worry about it, because it’s completely normal for that to happen in this pose. Simply focus on pushing the heels down as much as you can, so that you feel the stretch on the soles of your feet.
Next, make sure that you’re looking straight ahead, and that your neck is relaxed. Also, spread your fingers wide and press your hands into the ground, while trying to push your hips and heels back even more.
Stay here for a couple breaths before lowering your knees to come out of the pose.
2. Bound Angle Pose
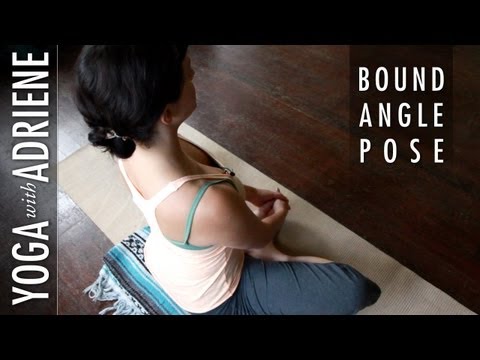
Benefits
Opens the hip flexors, straightens and lengthens the spine, releases the muscles in the neck, and stretches the inner soles of the feet.
Directions
Start off in a comfortable cross-legged position. From here, slowly uncross your legs and bring the soles of your feet together, with your knees still bent and lying on the floor.
Next, use your hands to scoot your feet closer to your groin and feel the deeper stretch in your inner thighs. After that, interlace the fingers of your hands and then place them palms up, under the pinky toes of your feet, so that they’re cradling the top part of your outer feet.
Straighten your spine and tuck in your stomach. Then, straighten your arms, and rotate your elbows inward. Start to focus on breathing noting the knees down even more, so that your feet are also more grounded, and you can view more of the soles of the feet.
Stay and breathe here for a couple breaths once you’re in the full pose.
3. Staff Pose
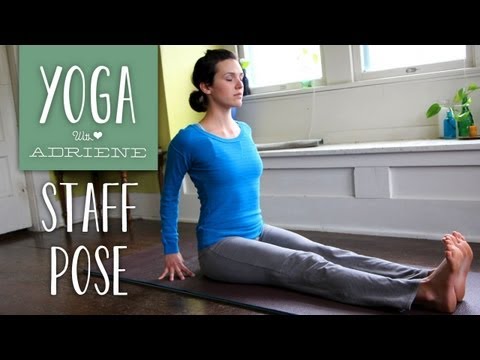
Benefits
Improves upper body posture, stretches neck muscles, entire foot and back of legs, and strengthens the core.
Directions
Come into a seated position with your legs out in front of you. Bring the legs together, and the palm of your hands on the floor by your hips.
From here, we’ll start to strengthen the pose. Actively sit up tall to lengthen your spine. Imagine a string on your head being pulled upward. Next, bring your shoulders back and down, so you feel a stretch in your neck muscles, and you open your chest, making it easier to breathe. Flex your feet and try to spread your toes horizontally, creating space between them. Ground the palms of your hands into the mat or floor to activate your arm muscles.
Once in the full pose. Take a couple of deep breaths, and then relax the muscles of the entire body.
4. Garland Pose
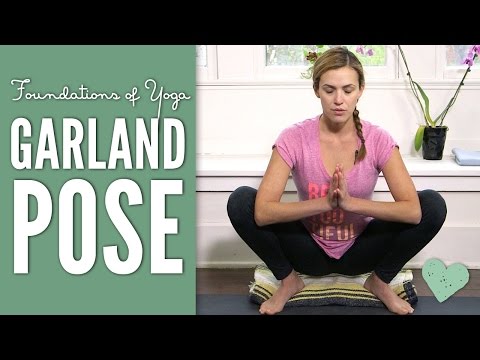
Benefits
Opens hip flexors, stretches Achilles’ tendons and plantar fascia and mildly stretches spine and chest muscles.
Directions
From a standing position, make sure your legs are hip-width apart and slightly turn out your toes about 45 degrees.
Then, come down into your lowest squat. If your heels start to lift, roll a blanket a couple times and put it under your heels for support. Otherwise, keep the feet flat on the floor. If you feel unbalanced, turn your feet outward or inward more until you feel stable in your squat, and without pain.
Next, bring your hands into a prayer pose at the center of your chest, and put your elbows on the inside of your knees. Then, use your elbows to push open your hips, even more, giving you a deep stretch in the hip flexors. Lengthen your spine, so that you’re not hunched over, and set your gaze forward or down at the ground.
Stay in the full pose for a couple breaths, and then release from the pose, by relaxing your hands and coming into a seated position or standing.
5. Toe Pose
Benefits
Strongly stretches the toes, top of the feet, and the arch of the foot, and mildly stretch the quads of the thighs.
Directions
Start off in a kneeling position, with your torso stacked over your hips, your knees right next to each other and touching, and the tops of feet flat on the ground or mat.
Next, curl the toes under, so the top of your feet are no longer flat on the mat, but facing your knees. Then, start to bring your hips back and sit your bum on the heels of your feet. This will create a strong stretch in your toes.
Rest your hands on your thighs, straighten your back and tilt forward slightly, so holding the toe stretch is manageable.
Once in the full pose, take a couple breaths, and then release your toes, and come into a comfortable kneeling position.
Finish your practice with a relaxing child’s pose, or come onto your back for savasana, and stay there for about 5 minutes.
Do Yoga Toes Work for Plantar Fasciitis?
Yes, actually, another aspect of yoga that is helpful for plantar fasciitis is the famous “yoga toes”. This is the nickname for the action of spreading your toes horizontally, as we did in staff pose.
If you try it right now, you’ll notice a deep stretch for the tendons between your toes, going all way down the soles of your feet.
However, if you try this and cannot do it, it is most likely that you’ve lost the ability over time from not doing it. This was a realization I had when I first learned about yoga toes.
I never thought I had a reason to do it. However, in yoga, it helps you to stabilize in balancing poses.
It keeps your feet in everyday life from getting permanently squished together, which in part is caused by many modern-day shoes such as high heels, and fitted sneakers.
If you practice focusing on spreading your toes daily, you may start to see progress. That being said, if you keep trying with no such luck, you can use toe separators to help gain the ability.
You may be familiar with foam toe separators if you’ve ever gotten a pedicure or have done them yourself. However, there are some toe separators that are specifically made for yogis.

YogaBody makes a product called Awesome Toes Corrective Spacers, to help with posture, plantar fasciitis, bunions, blisters, overlapping toes, and other foot issues.
They are designed not only to wear while you’re sitting but also while active. So you can wear them while barefoot, or while wearing shoes, and doing activities such as yoga, walking around your house, running, or even while you sleep.
Also, they are very flexible and latex-free, making them comfortable to wear, although, it’s recommended you start off wearing them only a few minutes at first, and slowly working your way up to wearing them longer since the bodily changes are gradual, yet dramatic.
Awesome Toes Corrective Spacers is an effective and unique product for plantar fasciitis that I strongly recommend using this product with the five yoga poses I explained previously. Watch the video above to learn more about Awesome Toes Corrective Spacers.
* Note: This article is not sponsored by YogaBody and all opinions are my own.
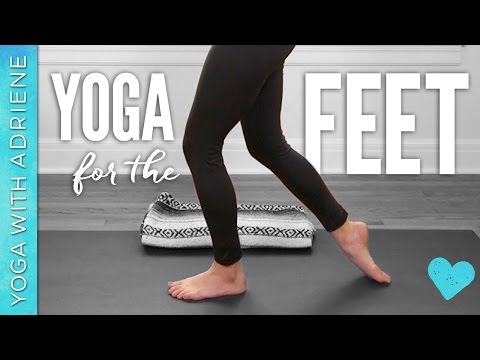
Taking Your Feet for Granted
Aren’t we all guilty of taking our feet for granted at one point? I know I have.
I used to work as a certified nursing assistant and would be on my feet for 12 hours straight. I was ignoring the immense aching in my shoes.
After a while of this suffering, I finally took notice and learned some useful ways to care for my feet.
In addition to using toe separators and certain yoga poses for plantar fasciitis, try some of these other foot remedies:
- Use a pumice stone in the bath or shower to scrub calluses off your soles.
- Place your feet in warm water with Epsom salt and essential oil or flowers while you watch TV after a long day of walking.
- Ask your significant other for a foot massage, or pay to get a 30-minute massage in your area.
- Pamper feet using heavy body butter.
- Wear well-made shoes
Our feet are the foundation of our body. If we do not take care of them, not only will our feet and toenails suffer over time, but so will the rest of our body.
As mentioned earlier, posture is highly dependent on foot health, and footwear choice, and with bad posture, comes body pain. Prevent or reverse this by creating a weekly routine for your feet using some of the recommended choices above.
Over time, you will see your posture change, your mood increase, and your feet will feel and look a hundred times better. Start now to put that pep back in your step!